
Easy Christmas Thumbprint Cookies with Sweet Holiday Icing

I did what I normally do with my recipes: I took a shortcut. These easy Christmas Thumbprint Cookies start with a sugar cookie mix, so there’s less measuring and more time for the fun part—rolling, sprinkling, pressing, and filling. I made the sweet center icing by hand and rolled every one of those little suckers myself. Anywhere I can save time, I will, and yes, I’m still proud of the manual labor I did do.
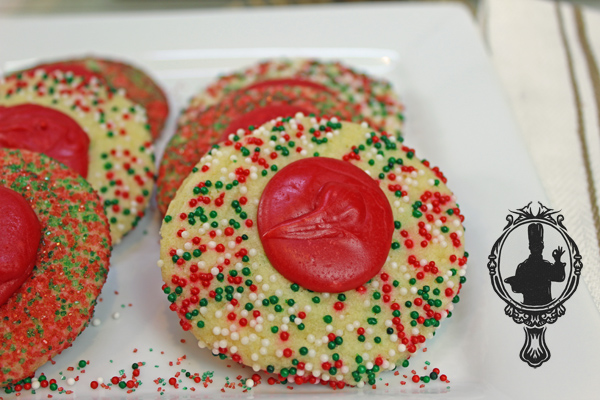
Thumbprint cookies get their name from the little dip pressed into the center of each dough ball. The well holds jam, chocolate, or—in this festive version—a bright, sweet icing. The indentation can puff up while the cookies bake, but that is an easy fix.
You do not have to use your thumb, either. The rounded end of a wooden spoon, a measuring spoon, or the bottom of a small cookie scoop works nicely. I started with my thumb, then gently pressed the centers again with the bottom of my cookie scoop as soon as the cookies came out of the oven. Work carefully while they are warm, and you will get a tidy little well without cracking the cookie.
The cookies are tender and buttery on their own, but that center is the best part. One bite gives you soft sugar cookie, crunchy sprinkles, and a creamy pop of icing. Fair warning: that icing is sa-weeeet, which makes these perfect for a holiday cookie tray or for anyone with a serious sweet tooth.
What I Used
I used Betty Crocker Sugar Cookie Mix plus the ingredients listed on the package. For the outside, choose any holiday sprinkles you love. For the center icing, I used confectioners’ sugar, butter, milk, red candy coating, and vanilla extract. Vanilla keeps the flavor classic, but almond extract gives it a bakery-style twist and peppermint extract makes it extra Christmasy. Start with a tiny amount of stronger extracts—you can always add more.

Fun Facts About Thumbprint Cookies
- A cookie with several names: Thumbprint cookies are often linked to the Swedish hallongrotta, which translates to “raspberry cave.” They have also been called thimble cookies because bakers sometimes used a thimble rather than a thumb to make the center.
- The filling is the playground: Traditional versions often use raspberry jam, but modern thumbprints can hold icing, lemon curd, chocolate, caramel, or another thick filling.
- They are made for holiday baking: Their small size, colorful centers, and easy decorating make them a natural fit for cookie swaps, dessert trays, and homemade gifts.
Tips and Tricks for Perfect Thumbprints
- Follow the package first. Brands and package sizes can vary, so use the butter, egg, oven temperature, and bake time printed on your sugar cookie mix.
- Keep the dough easy to handle. If it feels sticky or the balls flatten before baking, chill the dough for 10 to 20 minutes.
- Make even cookies. A small cookie scoop helps every cookie bake at roughly the same rate.
- Press gently. Make a deep enough well for the icing, but do not push all the way through the dough. If the edges crack, smooth them back together with your fingers.
- Give them room. Leave space between dough balls so they can spread without becoming one giant Christmas cookie.
- Watch the edges. Remove the cookies when they are set and just beginning to turn lightly golden. Overbaking can make them dry and fragile.
- Cool before filling. Let the cookies cool completely so the icing stays thick instead of melting into the center.
- Add liquid slowly. When mixing the icing, add milk a little at a time. It should be smooth enough to spoon or pipe, but thick enough to stay in the well.
Easy Flavor Variations
Use the same cookie base and change the center to match your holiday mood. Try vanilla icing with red and green sprinkles, peppermint icing topped with crushed candy cane, almond icing with sliced almonds, or white icing drizzled with melted red candy coating. For a less-sweet batch, skip the icing and spoon in a thick raspberry, strawberry, or apricot preserve after the cookies cool. A mix of red, white, and green centers looks especially pretty on one platter.
Serving Suggestions
- Arrange the cookies on a holiday tray with chocolate cookies, gingerbread, and something salty such as pretzels for contrast.
- Serve them with coffee, hot cocoa, cold milk, or peppermint tea.
- Place paper liners between cookies in a gift tin so the icing and sprinkles stay neat.
- For a party, make two or three icing colors and group them in rows or a wreath shape.
- Set them out after dinner as a small bite with fresh berries or orange slices to balance the sweetness.
Storage and Make-Ahead Tips
Let the icing set completely before storing the cookies. Keep them in a single layer in an airtight container at room temperature for up to one week for the best texture; if you must stack them, separate the layers with parchment or wax paper. Keep different flavors in separate containers so peppermint or almond does not take over the whole batch. For longer storage, freeze completely cooled cookies in a sturdy airtight container for up to two months. Thaw them in the closed container at room temperature so condensation forms on the container instead of the cookies. If possible, freeze the cookies before icing and decorate them after thawing for the neatest finish. Prepared commercial cookie dough should be refrigerated and used according to the package date; USDA FoodKeeper guidance lists about two months in the freezer for best quality.

Need More Christmas Goodie Ideas?
Items and Ingredients Used in This Recipe
If you are interested in any of the items I used—or something similar—you will find a few options below. These are affiliate links, which means I may receive a small commission from qualifying purchases at no additional cost to you.
If you like this recipe—or any other dish on my site—feel free to sign up for the weekly email to see what we have been cooking. Look to the side of the page for the sign-up button.
If you have a question, tried a fun variation, or spotted one of our “bloopers,” please do not hesitate to contact us. We’re all human—and I love hearing what worked in your kitchen.
This post may contain affiliate links. Please view my disclosure policy for more information.
Rock on!
~Bobbi
Christmas Thumbprint Cookies
Equipment
- Mixer or Stand Mixer
- Baking Sheet
- Cooling Rack, Optional
- Saucepan
Ingredients
- 1 Pkg Betty Crocker Sugar Cookie Mix Use ingredients, follow directions to make dough
- 1 Cup Sugar, White
- 1/4 Cup Butter
- 1/4 Cup Milk I used 2% Milk
- 8 Oz Red Candy Coating
- 1 Tsp Vanilla Extract Substitute if desired

Instructions
- Preheat the oven to 375° (or 350° for dark or nonstick baking sheet)
- Make sugar cookie dough as directed. NOTE: I did not include the ingredients in the list in case you choose a different brand to make.

- Using a cookie scoop or your hands, make a ball about 1 inch or so. Roll the ball in your sprinkles. Place on a covered/sprayed baking sheet.

- Press your thumb, or other object of your choice, in the middle of the cookie, making an indention.

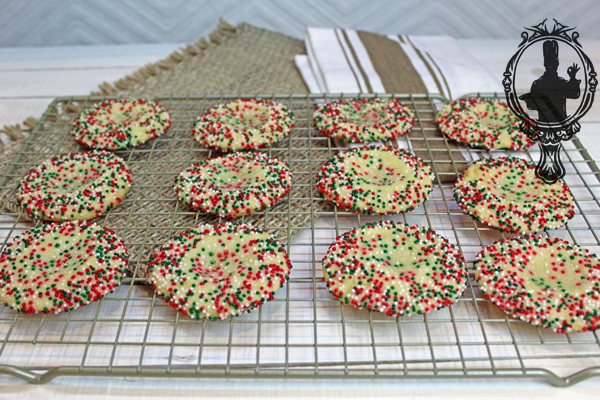
- Bake 7-9 minutes, or until done. Remove from oven and transfer cookies to a cooling rack. Let cool for 10 minutes while you make the icing. NOTE: If you have more batches to make, hold off on the next step "ICING" until all of your cookies are ready to be filled.
- ICING – bring the sugar, butter and milk to a boil in a saucepan, stirring constantly. Will burn quickly, if you don't watch this. Stir for 1 minute after it comes to a boil. Remove from heat and add the candy coating and vanilla. Keep stirring until it is combined and smooth.

- Spoon the icing in the "thumbprint" of each cookie. Let set – 15-20 minutes.
Notes
Nutrition


Pingback: Christmas Muddy Buddies – Through the Cooking Glass
Pingback: Christmas Trash Bars – Through the Cooking Glass
Pingback: Christmas Cookie Fudge – Through the Cooking Glass
Pingback: Reeses Pieces White Chocolate Fudge – Through the Cooking Glass
These cookies are so cute and taste so good!! I wanted to add a new cookie to my goodie plates I gift at Christmas and this one wins!
Maria Thomas recently posted…Christmas Butter Cookies Recipe 2019
Aw…thank you so much for leaving that comment! Makes my day. Hope you have a very Merry Christmas!!
Thanks for stopping by.
Pingback: Christmas Cookie Fudge | Through the Cooking Glass
Pingback: Christmas Trash Bars | Through the Cooking Glass
One of my absolute favorites. Thanks for sharing the recipe!
I love the icing in the middle the best!! Thanks for stopping by and checking them out!!
Have a great day 😉
Wow this is a great recipe to add to a Christmas feast!
Thank you and thanks for stopping by!!
Have a great day!